kyle zetts
music: bandcamp | spotify | soundcloud
social: instagram | youtube | contact
How to build a video wall
How to build and configure a 2x2 video wall with Raspberry Pi's and PiWall.

Have some extra CRT TVs around? Don't want to spend hours wading through an old mailing list for a project that hasn't been updated in half a decade? Well buckle up folks, we're building a PiWall.
This is less of a general guide, and more of an in-depth look into the way that I deployed PiWall, with the hope that it may solve an issue that you might've run into.
Before we start, we'll need a few things:
- 4 x 13" CRT televisions with composite inputs.
- 4 x Raspberry Pi's with microSD cards. (Model 3b+ or higher)
- 4 x Raspberry Pi compatible 3.5mm to RCA A/V adapters.
- 1 x 5 port+ ethernet switch.
- 5 x ethernet patch cables.
- A computer. (Throughout this example I'm using a 2017 MacBook Pro)
- The ability to type commands into a terminal.
Installing Raspberry Pi OS
Download and install the Raspberry Pi Imager:
https://www.raspberrypi.com/software/
Download Raspberry Pi OS 10(Buster):
https://downloads.raspberrypi.org/raspios_lite_armhf/images/raspios_lite_armhf-2021-05-28/2021-05-07-raspios-buster-armhf-lite.zip
While writing this guide, Raspberry Pi OS updated to the latest Debian branch "Bullseye". Unfortunately there's been a change in Bullseye that removes a necessary dependency, libopenmaxil.so, which breaks pwomxplayer. Fortunately the kind folks at Raspberry Pi keep an archive of old images here, so we'll just use the previous release from May 28th, 2021.
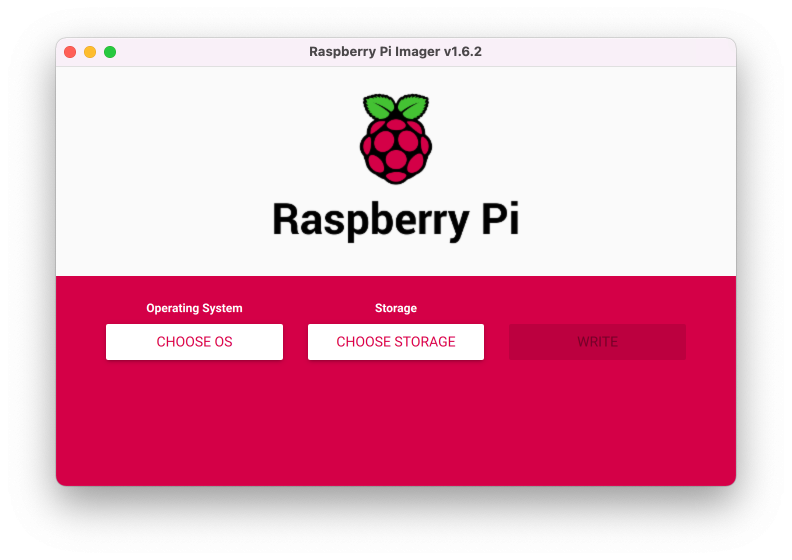
Launch the Raspberry Pi Imager, and click "Choose OS".
Scroll to the bottom, and select "Use custom".
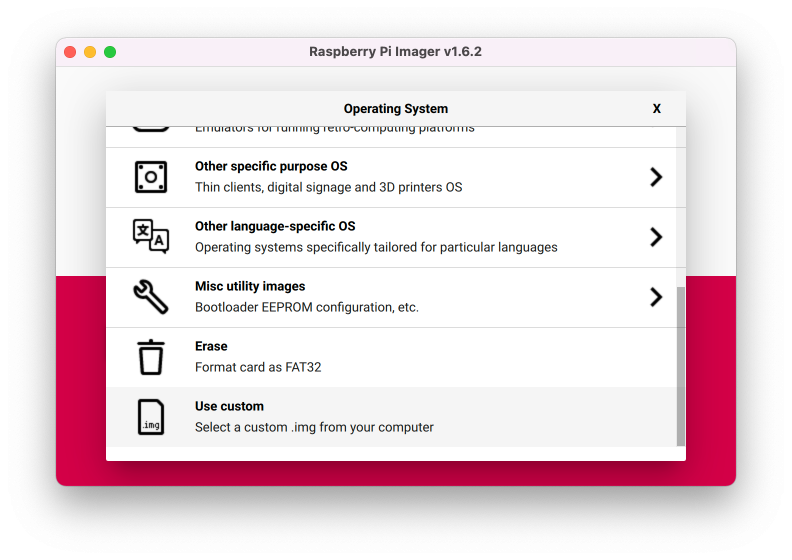
Locate and select 2021-05-07-raspios-buster-armhf-lite.zip, linked above.

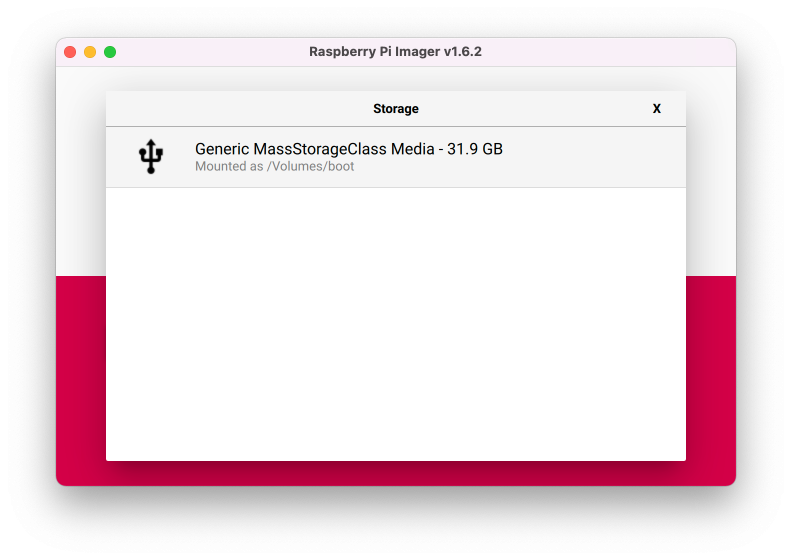
Click "Choose Storage", and select your microSD card.
Once you've got everything all set, click "Write"! This will copy the OS to your microSD card. Once it's finished, it will tell you that you can remove the microSD card from your computer, but not so fast! We have some more configuration to do before we boot up for the first time. You'll probably need to pop the microSD card out and back in to re-mount it.
Open a Terminal and create a blank file called ssh in /Volumes/boot/(or wherever your mount point is). This will enable SSH out of the box on boot.
$ touch /Volumes/boot/sshNext, let's get that old config.txt out of the way!
$ mv /Volumes/boot/config.txt /Volumes/boot/config.txt.oldCreate a new config.txt in your microSD card's boot directory, and copy in the following config:
# Enable audio (loads snd_bcm2835)
dtparam=audio=on

[pi4]
# Enable DRM VC4 V3D driver on top of the dispmanx display stack
dtoverlay=vc4-fkms-v3d
max_framebuffers=2```

[all]
#dtoverlay=vc4-fkms-v3d
enable_tvout=1
So let's recap: We've copied the Raspberry Pi OS Buster image to the microSD card, enabled SSH, and enabled the A/V out ports to hook up to the TV in config.txt. This is necessary for the Raspberry Pi Model 4 if you're using them, but it doesn't have an adverse affect on the Model 3b+ either so I just put it everywhere.
Configuring the System
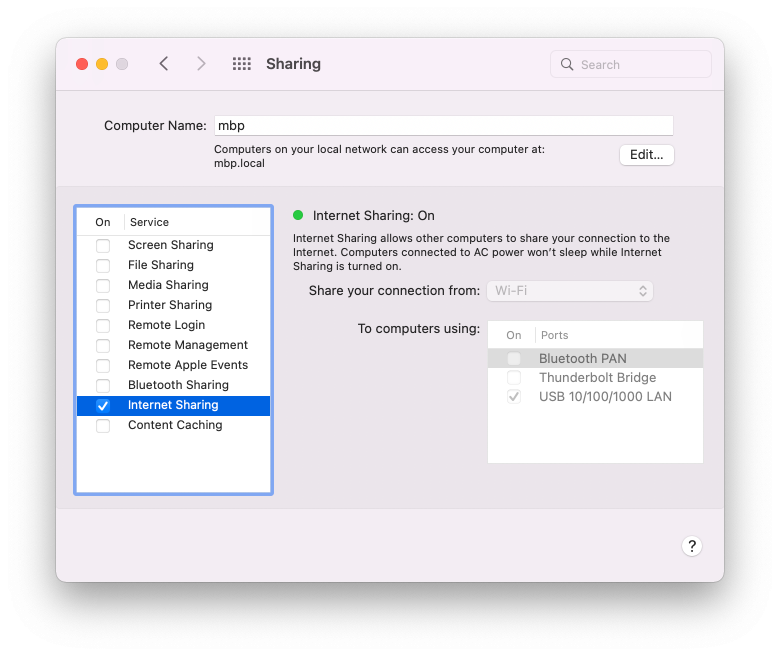
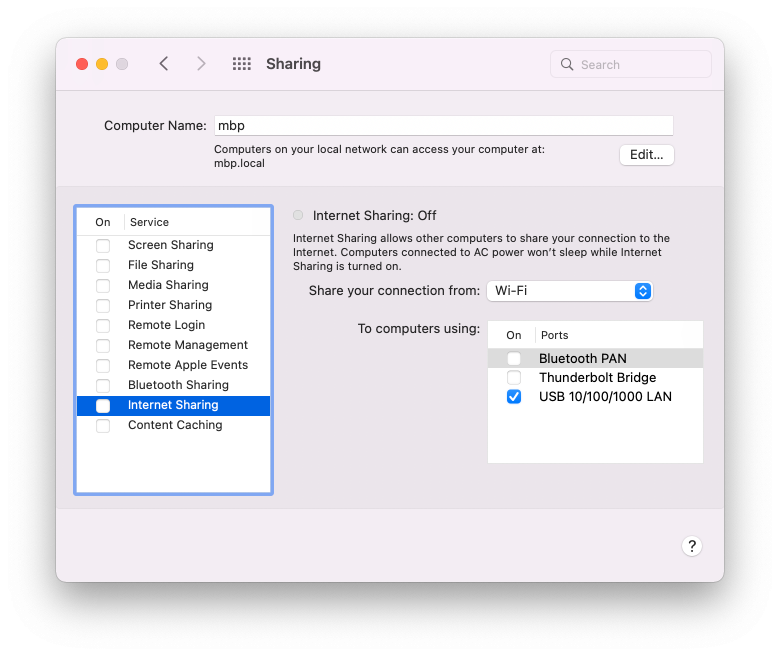
To access the device via SSH without having to get up from my desk, I just enable Internet Sharing on my MacBook, which acts as a DHCP server to give an address to the Raspberry Pi. This is only necessary for the initial configuration and just how I typically do it. You could plug in a mouse and keyboard or go plug it in to your main network to get an IP, as long as you can access the device and login.
Go to "System Preferences", "Sharing", and enable "Internet Sharing". For my scenario, I'm sharing the connection from my WiFi adapter to the USB Ethernet adapter.
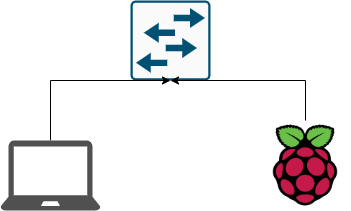
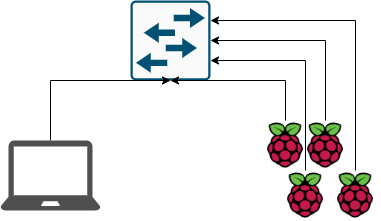
Now its time to get things hooked up! Plug the computer, and the Raspberry Pi into your switch. At this point, our network should look something like this:
Boot up the Raspberry Pi with your microSD card inserted. After a few moments, it will be ready for us to connect for the first time!
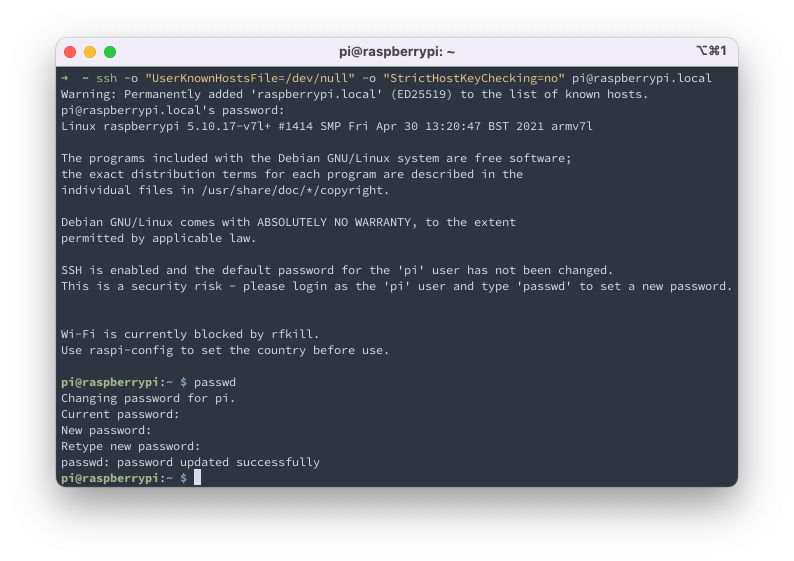
By default, Raspberry Pi OS boots with a hostname of raspberrypi.local, and a user called pi with the password raspberry.
Open your Terminal, and connect to the device. (I'm including some extra command switches so we don't have to edit ~/.ssh/known_hosts every time.)
$ ssh -o "UserKnownHostsFile=/dev/null/" -o "StrictHostKeyChecking=no" pi@raspberrypi.localOnce logged in, let's change the default password to something unique to us. Type passwd at the prompt, and hit enter. It will prompt you for the existing password(raspberry).
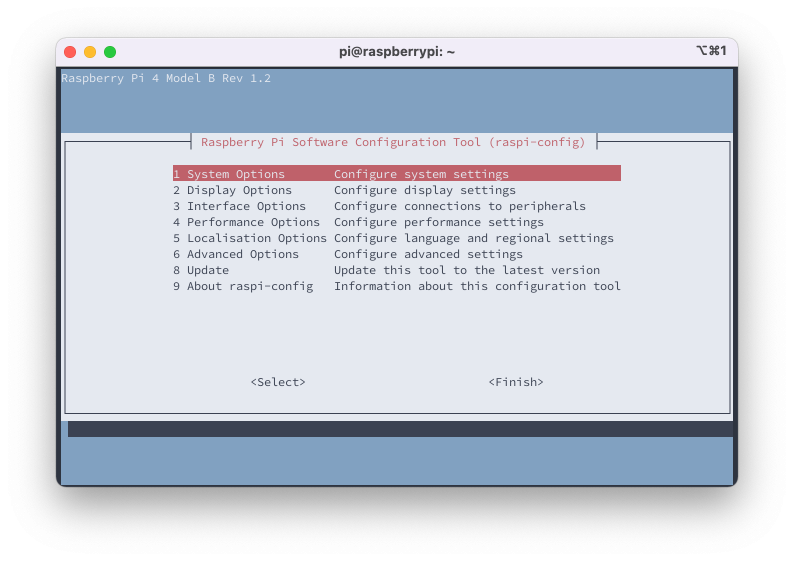
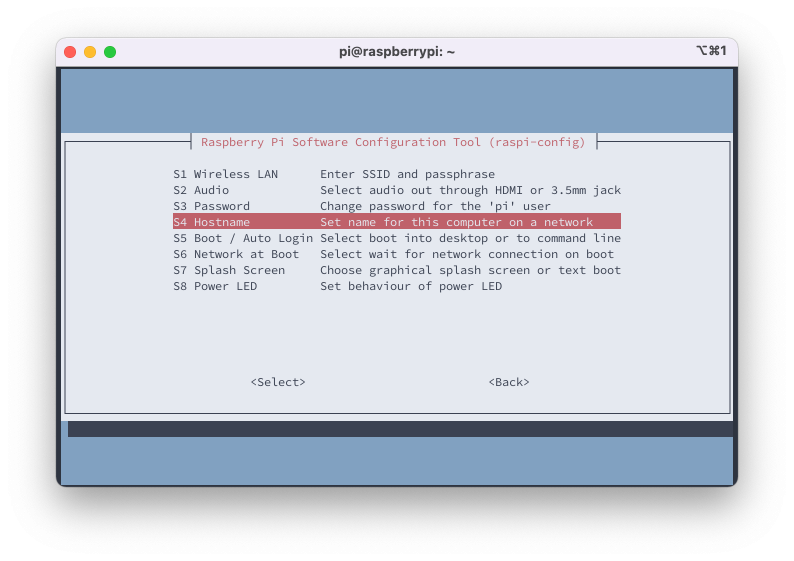
Now let's set some configurations using raspi-config. We'll be enabling and connecting to WiFi so the devices have internet connectivity after disabling the Internet Sharing, as well as setting the hostname.
Run sudo raspi-config.
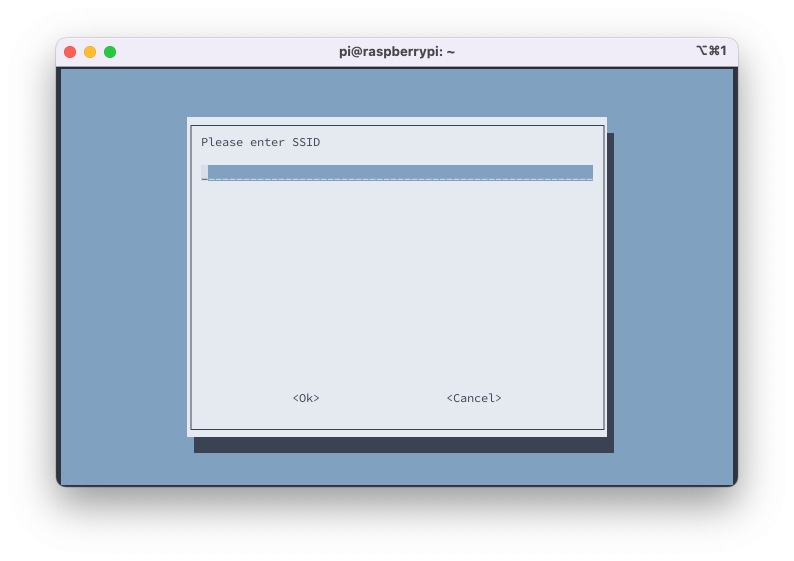
Select "System Options", then "Wireless LAN"
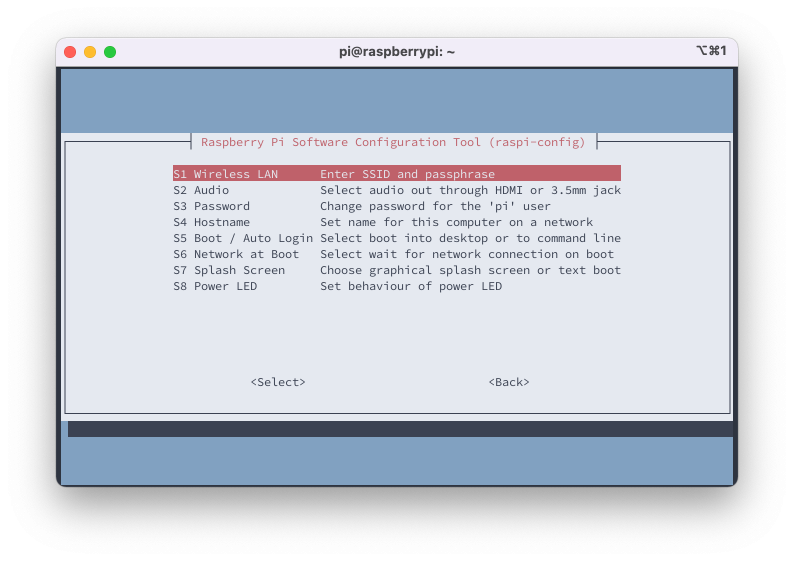
Select your country, then enter your SSID and the corresponding passphrase.
Once finished with the WiFi information, select "System Options" and then "Hostname".
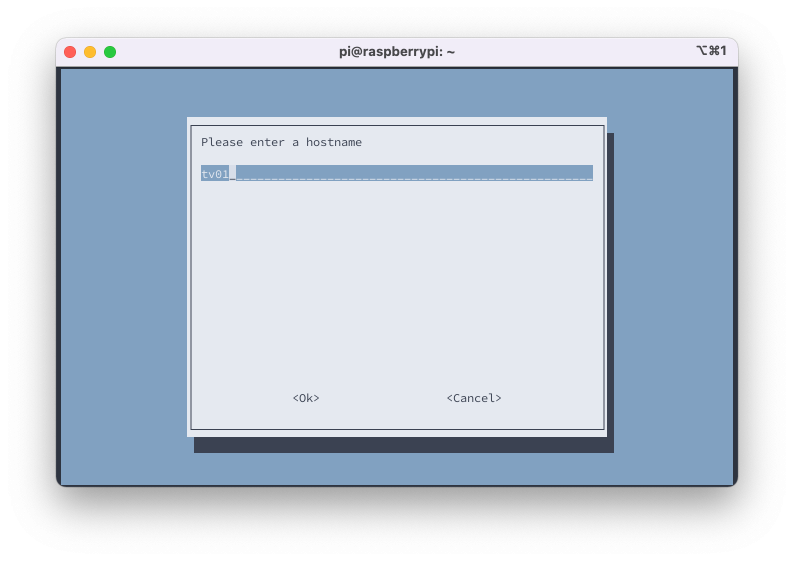
Enter your desired hostname. This should be something easy to remember for troubleshooting purposes, as well as keeping scalability in mind. The obvious choice for me is tv01, additional devices being tv02, tv03, tv04, and so on...
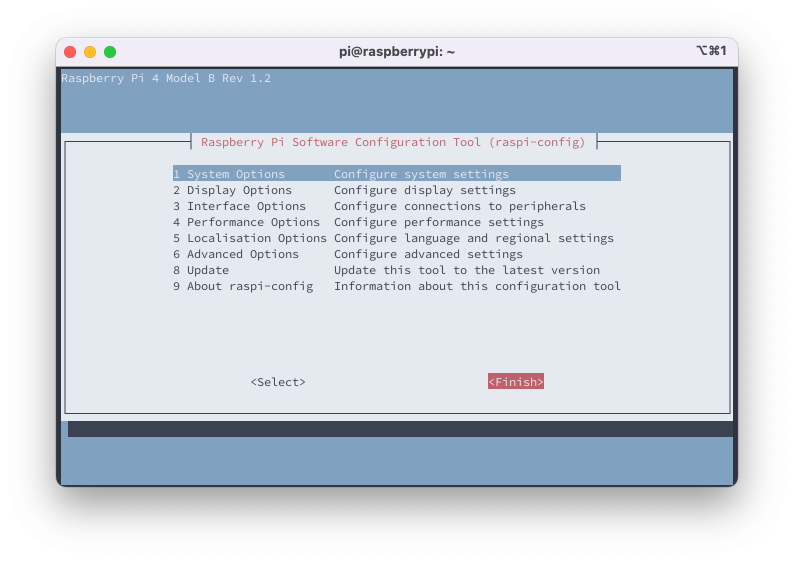
Once finished with the hostname, tab down to "Finish" and then reboot when prompted.
Once the device reboots, reconnect to it using the new hostname that you just set, and login as pi with your new password.
ssh -o "UserKnownHostsFile=/dev/null/" -o "StrictHostKeyChecking=no" pi@tv01.local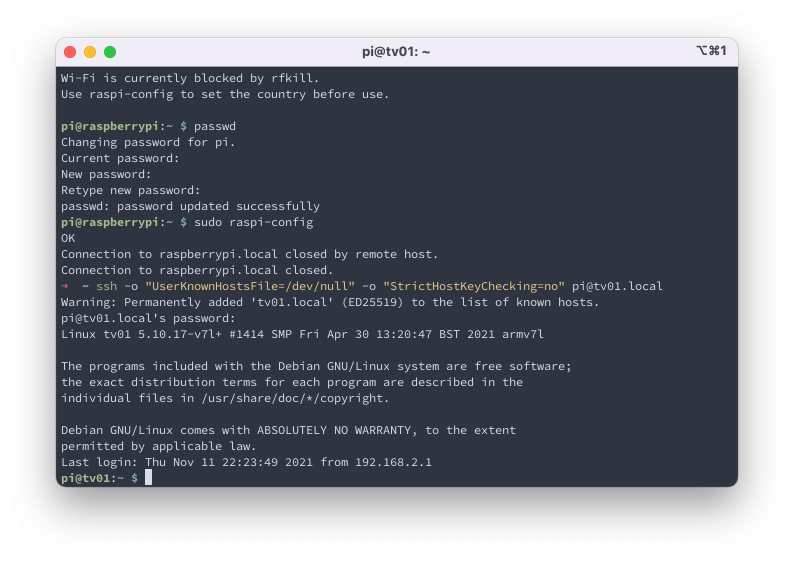
Nice.
This next part is probably unnecessary but I like things fresh, so lets give it a quick update.
$ sudo apt update && sudo apt dist-upgrade -yI'm somewhat of an IPv4 maximalist, so lets disable IPv6 entirely. Open up /etc/sysctl.conf with sudo or as root with your favorite text editor(yes I use nano don't @ me), add the following to the bottom of the file and save.
net.ipv6.conf.all.disable_ipv6=1
net.ipv6.conf.default.disable_ipv6=1
net.ipv6.conf.lo.disable_ipv6=1
net.ipv6.conf.eth0.disable_ipv6 = 1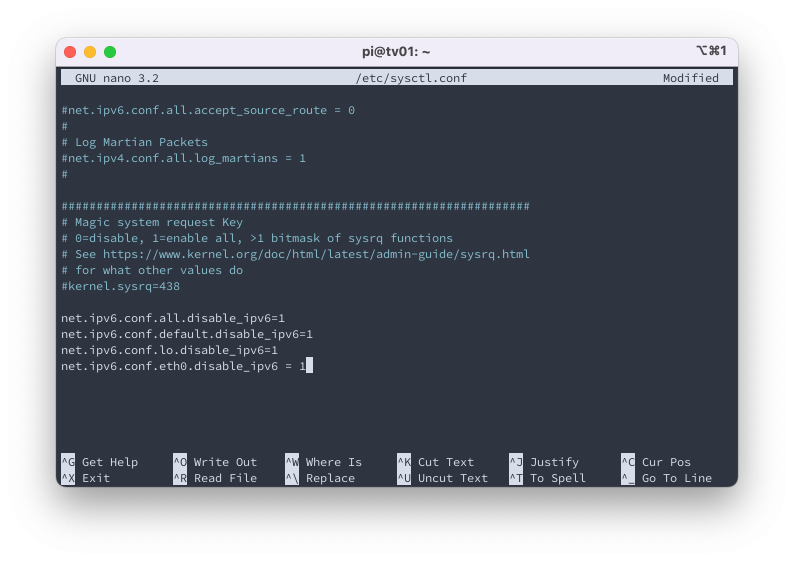
We need to set a static IP to be used on this internal network. With hostnames like tv01, tv02, etc, it's most sensible for me to scope out the network with corresponding IP addresses. in this case its going to be:
tv01.local = 10.0.0.101
tv02.local = 10.0.0.102
tv02.local = 10.0.0.103
tv04.local = 10.0.0.104
We're working on tv01 at the moment, so let's set 10.0.0.101 as a static IP on eth0. Again, using sudo, open /etc/dhcpcd.conf with your text editor.
Scroll down to find the "Example static IP configuration" block and edit it to look like this. Were setting the IP, DNS server(not needed but whatever), and the nogateway flag so the dumb computer doesn't try to send 10.0.0.x data out the wrong interface.
    # Example static IP configuration:
        interface eth0
        static ip_address=10.0.0.101/24
        static domain_name_servers=1.1.1.1 8.8.8.8
        nogateway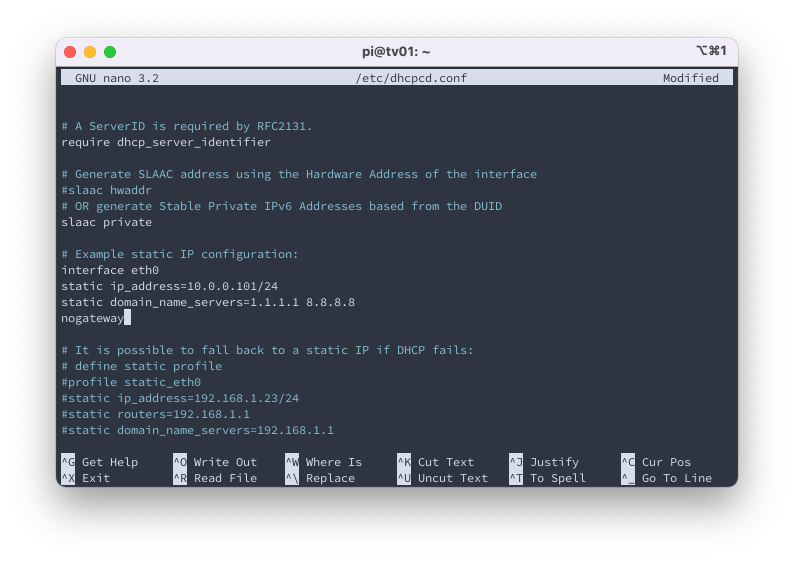
Change the 10.0.0.101 to whatever corresponds with the device your configuring. Next we need to add a static route for the PiWall traffic. PiWall uses UDP multicast to receive the video. Multicast addresses are basically like a firehose that blasts out to all of the attached devices on the network. We don't want that traffic getting confused and trying to use the WiFi connection, so we need to route it explicitly to the static network.
Create the file /lib/dhcpcd/dhcpcd-hooks/40-route, and add the following line:
ip route add 224.0.0.0/4 via 10.0.0.101Save the file and reboot tv01.
Once the device has rebooted, connect again via SSH by running ssh -o "UserKnownHostsFile=/dev/null/" -o "StrictHostKeyChecking=no" pi@tv01.local.
Now let's run ifconfig on tv01. We should have a WiFi connection getting DHCP, a static IP on eth0, and no IPv6 addresses.
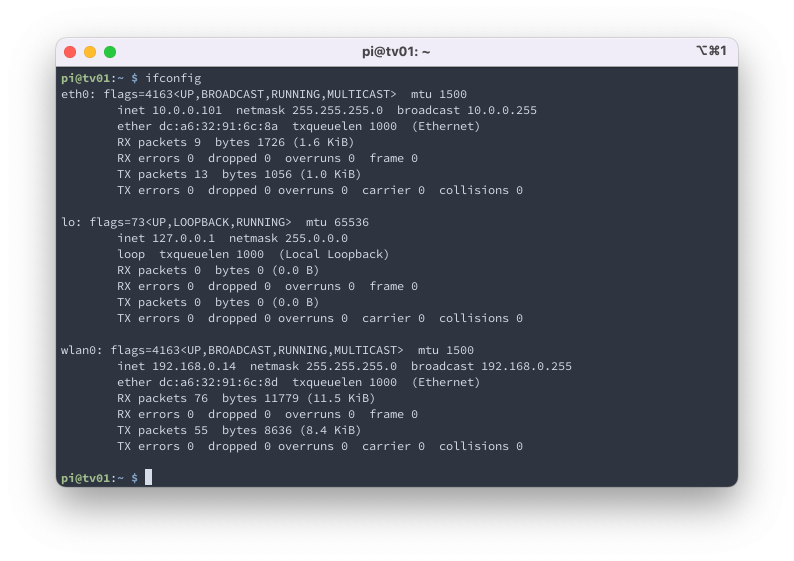
clean. Time to install PiWall! Well almost. Dependencies first.
Install libegl1-mesa-dev.
$ sudo apt install libegl1-mesa-devOnce that has finished, download the PiWall packages.
$ sudo wget http://dl.piwall.co.uk/pwlibs1_1.1_armhf.deb
$ sudo wget http://dl.piwall.co.uk/pwomxplayer_20130815_armhf.deb
And then install them both.
$ sudo dpkg -i pwlibs1_1.1_armhf.deb && sudo dpkg -i pwomxplayer_20130815_armhf.deb
Now type exit to disconnect from the SSH session.
Ok so its time for another recap! We've installed the OS, configured system properties, configured networking, and installed the PiWall packages. Let's get set up for a 1 screen test.
Testing the Software
First, we need to disable Internet Sharing on the MacBook, and instead configure the Mac's ethernet adapter to use the static IP 10.0.0.10. This is in the correct subnet but won't interfere with the other static addresses.
Go to "System Preferences", then "Sharing", and disable "Internet Sharing".
Next, go back to "System Preferences", click "Network", and configure the Ethernet adapter to use a static/manual address.
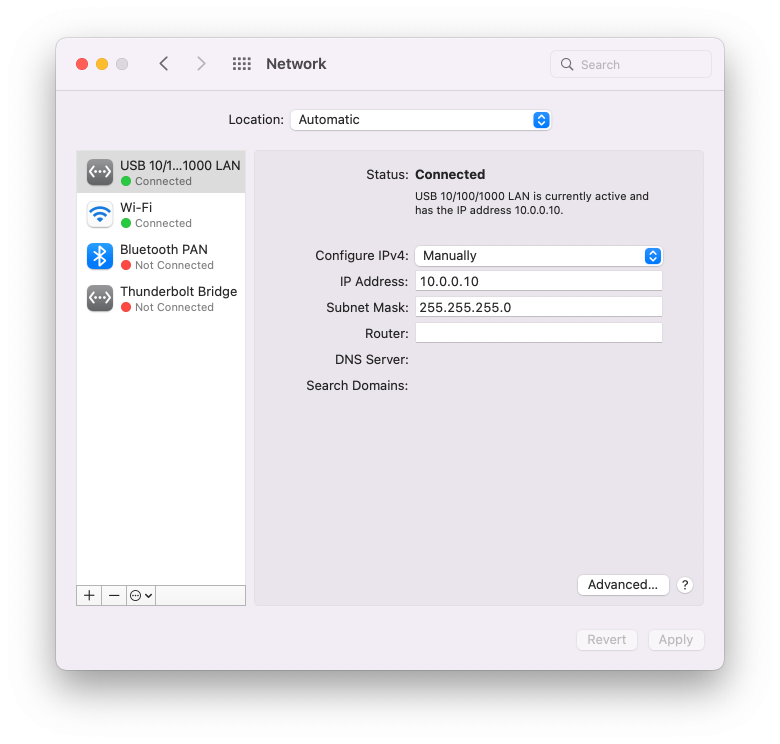
We'll need to set a static route on the MacBook as well, so it doesnt accidentally get confused and send multicast out the wrong interface. On my device, the ethernet adapter is en4. You can determine this by running ifconfig on your local device.
Enter the following command on the Macbook.
$ sudo route -nv add -net 239.0.1.23 -interface en4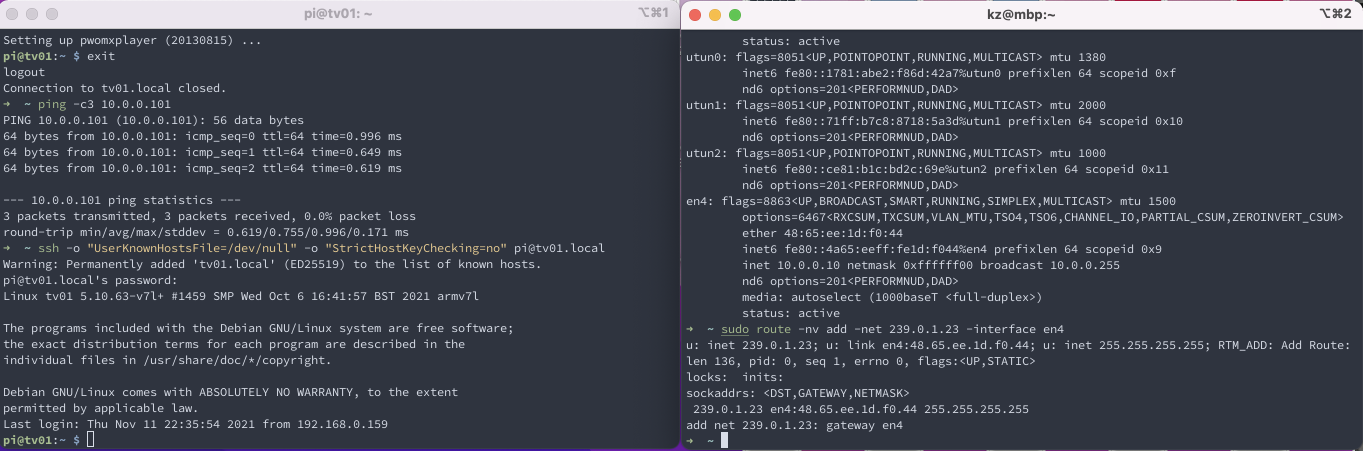
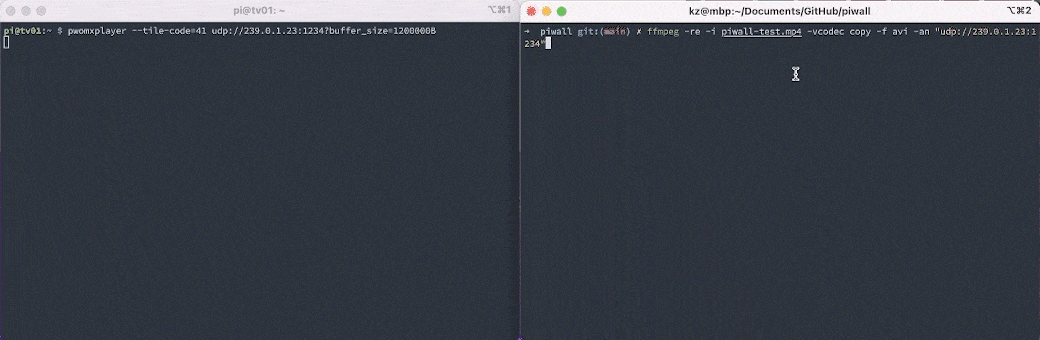
Now time to test the system. On tv01, run the following command:
$ pwomxplayer --tile-code=41 udp://239.0.1.23:1234?buffer_size=1200000BThis will start the PiWall listener, and --tile-code=41 instructs it to show the top left portion of a video, (ideally) on the top left screen.
Now let's use ffmpeg to stream a video. If you dont have ffmpeg, it can be installed via [brew](https://brew.sh/).
I've provided a short test video if you need, but any video 1080p or lower should work fine.
On the MacBook, open a Terminal, download the [piwall-test.mp4](https://github.com/crtdream/piwall/raw/main/piwall-test.mp4) video, and run ffmpeg -re -i piwall-test.mp4 -vcodec copy -f avi -an "udp://239.0.1.23:1234".
$ wget https://github.com/crtdream/piwall/raw/main/piwall-test.mp4

$ ffmpeg -re -i piwall-test.mp4 -vcodec copy -f avi -an "udp://239.0.1.23:1234"
You should see some activity on both tv01 and the MacBook's terminals, and if you're connected to a TV, you should see video playing!
Success!
From here you basically follow this workflow on the remaining Raspberry Pi's, creating tv02, tv03, and tv04.
Our end network will look something like this:
So far we've streamed a video to PiWall, but the --tile-code=$n method only gives a rough approximation of the placement and does not compensate for the bezels. Luckily we can create a configuration file to take care of that.
PiWall Configuration Files
PiWall's config file, .piwall, uses relative measurements to place the tiles. This can be done in milimeters, centimeters, inches, your choice. I used mm. More information about the config options can be found here.
You need to measure from the inside of the bezel on the top left, across to the inner bezel on the 2nd display, and then measure vertically, as well as the offsets in the bezels. Mine worked out to be something like this:
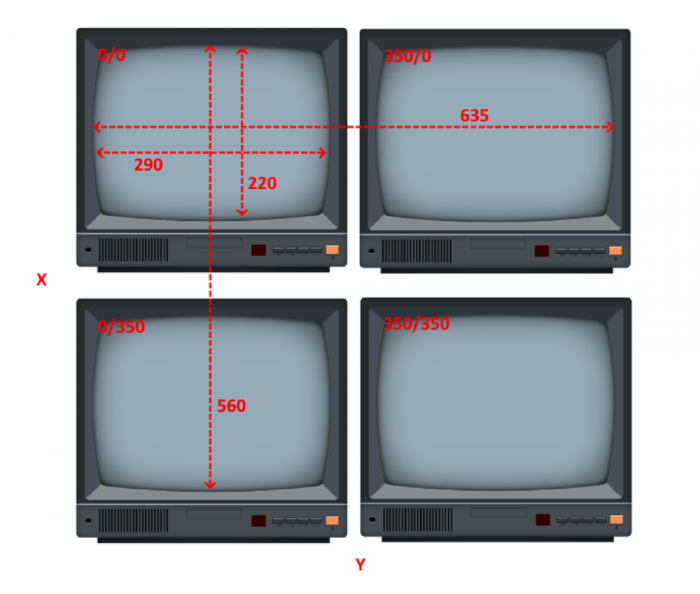
measurements in mm.
Once you've determined your measurements, create a file on each Raspberry Pi called .piwall, in /home/pi.
For most 13 inch 2x2 setups, this configuration should be fine.
# wall definition for 2x2 screens with bezel compensation

[4bez_wall]
width=635
height=560
x=0
y=0

# corresponding tile definitions
[4bez_1]
wall=4bez_wall
width=290
height=220
x=0
y=0

[4bez_2]
wall=4bez_wall
width=290
height=220
x=350
y=0

[4bez_3]
wall=4bez_wall
width=290
height=220
x=0
y=350

[4bez_4]
wall=4bez_wall
width=290
height=220
x=350
y=350

# config

[4bez]
pi1=4bez_1
pi2=4bez_2
pi3=4bez_3
pi4=4bez_4
Next, on each individual pi, create a file called .pitile in /home/pi/. This will identify which Raspberry Pi should use which part of the configuration.
For example on tv01, the file /home/pi/.pitile would contain:
[tile]
id=4bez_1
For tv02, you'd set the id to 4bez_2, tv03 is 4bez_3, and tv04 is 4bez_4.
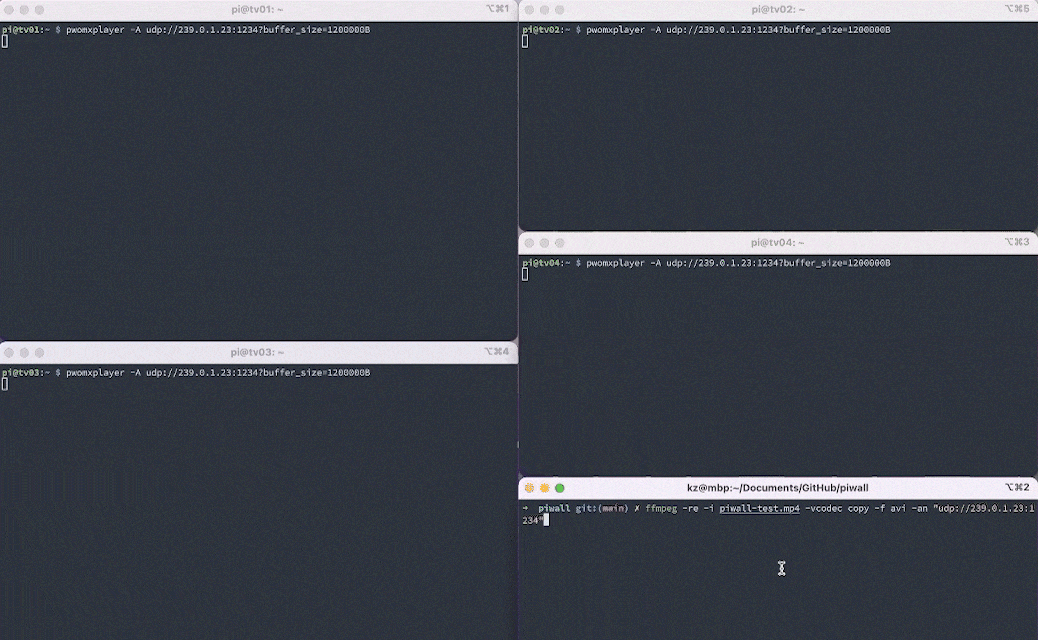
Once you have the .piwall config and the relative .pitile configs placed on all your Raspberry Pis, you can start pwomxplayer -A udp://239.0.1.23:1234?buffer_size=1200000B on all 4 Raspberry Pi's, and then run ffmpeg -re -i piwall-test.mp4 -vcodec copy -f avi -an "udp://239.0.1.23:1234" on the MacBook. You should see all of the TV's start playing video!

OBS Setup
Since we're using ffmpeg to stream video over network, it's rather trivial to use OBS for the same purpose.
Download and install OBS: https://obsproject.com/download
Go to "Settings", and then "Output", and switch the "Output Mode" to "Advanced".
Click on the "Recording" tab, and set the "Type" to "Custom Output (FFmpeg)".
Set the "FFmpeg Output Type" to "Output to URL".
Fill in the information below:
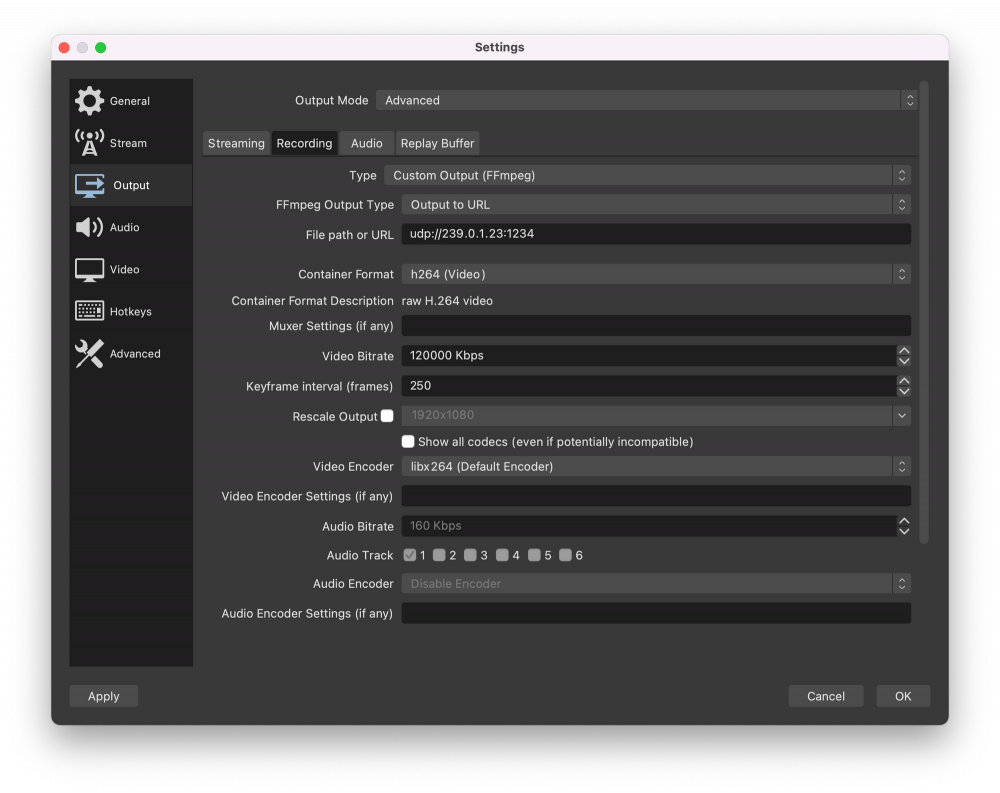
With this configuration, whenever you click "Record" in OBS, it will output to PiWall.
Troubleshooting
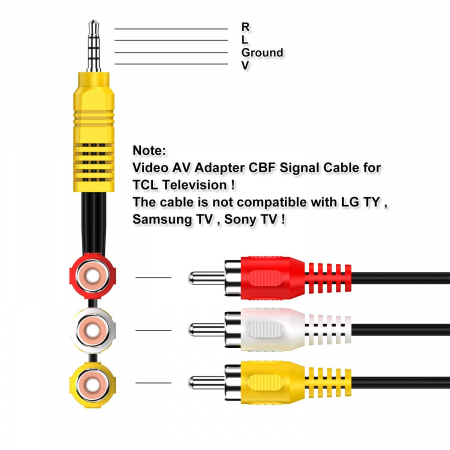
"I don't have any video on the TV when connecting with a 3.5mm A/V Adapter!"
You probably have the wrong 4-pole A/V adapter. Some of them have the Video and Ground pins switched, which will not work with the Raspberry Pi. The one you need has the Ground pin on 2.
 "My video is super laggy or choppy when streaming through
 ffmpeg!"
This usually happens with >30FPS or >1080P video. I'd recommend re-encoding your video with the following command and trying again:
ffmpeg -i "path to source.avi" -vcodec libx264 -crf 17 -r 30 -acodec copy "path to destination.avi"https://groups.google.com/g/piwall-users/c/MAE9oWAkoTw
"I get an error when I run pwomxplayer: pwomxplayer.bin: error while loading shared libraries: libopenmaxil.so: cannot open shared object file: No such file or directory!"
Sounds like you installed RaspiOS Bullseye rather than Buster. Please see "Installing Raspberry Pi OS" at the beginning of this article. You can check your distro release by running lsb_release -a.
Acknowledgements
Links that were helpful while researching this guide:
https://piwall.co.uk/information/installation
https://piwall.co.uk/information/configuration-file
https://groups.google.com/g/piwall-users/c/MAE9oWAkoTw
https://matthewepler.github.io/2016/01/05/piwall.html